Bloomreach
Bloomreach (opens in a new tab) is a digital experience platform that helps companies deliver personalized customer experiences through email marketing, data management, and e-commerce optimization.
Prerequisites
In order to integrate with Bloomreach, you'll need to collect the following information:
| Name | Description |
|---|---|
| Domain | Your Bloomreach API URL (default: api.exponea.com). You can find this in your Bloomreach account under Project Settings > Access Management > API |
| API Key* | Your Bloomreach API key. You can find this in your Bloomreach account under Project Settings > Access Management > API |
| API Secret* | Your Bloomreach API secret. You can find this in your Bloomreach account under Project Settings > Access Management > API |
| Project Token* | Your Bloomreach project token. You can find this in your Bloomreach account under Project Settings > Access Management > API |
| Bloomreach Customer ID Name | The name of the hard_id/soft_id for customers in Bloomreach (default: registered) |
| Bloomreach Identity Key* | The name of the identity (email or external_id) used in the privacy request that maps to the Bloomreach customer ID |
Events > Consent(get/set), GDPR > Anonymize customer, Export customer, Customer Properties > Others > Phone(get/set), Customer Properties > Others > Email(get/set) Integrating with Bloomreach
To integrate an existing system with Bloomreach:
- Navigate to Data map → View Systems and choose the system that you want to connect.
- Click on the Integrations tab.
- Pick the vendor or system type that you want to integrate with from the Connection type drop-down menu.
- Complete the required fields for the integration and click Save.
You may confirm your connection is working using the Test connection button, if desired.
To learn more, please see our guide for Managing Integrations.
When propagating consent preferences, if the user does not already exist in Bloomreach, Fides will automatically create the user in Bloomreach before applying their consent preferences.
Bidirectional Consent
Before configuring bidirectional consent, confirm that the Bloomreach system shares a data_use with each of the configured privacy notices. See Ensure data use overlap for details.
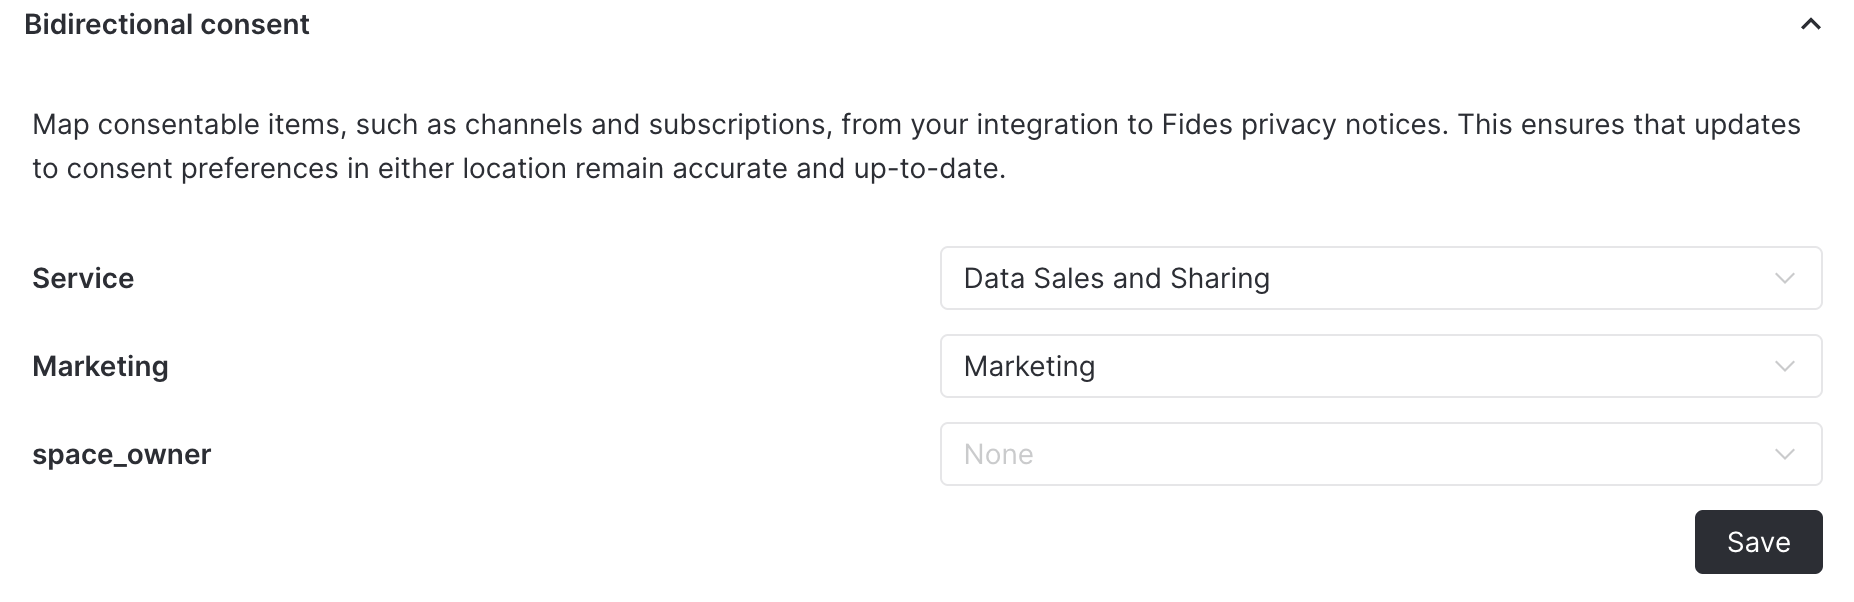
Bloomreach also supports bidirectional consent. To configure this, click on the Bidirectional consent accordion under the Bloomreach configuration form. This section allows you to map Privacy Notices in Fides to Consent Categories in Bloomreach. In the example below, setting Marketing for the Marketing information consent category will automatically subscribe and unsubscribe the user from that category if they opt-in or out of the Marketing privacy notice in Fides.
Consent changes should only be made through events. Changes made through the Bloomreach admin dashboard wont trigger a consent event and will cause fides to be out of sync.
Consent webhooks
Bloomreach supports webhooks that can be configured to automatically forward consent preference changes to Fides. When users update their consent preferences directly in Bloomreach, these changes can be automatically synchronized with Fides.
To set up consent webhooks we will need to setup an Authentication integration and a Bloomreach scenario.
Authentication setup
Fides supports two authentication methods for consent webhooks. OAuth2 client credentials (recommended), which handle token refresh automatically, and static Bearer tokes that requires manual token rotation every 90 days.
Option A: OAuth2 client credentials (recommended)
With OAuth2 client credentials, Bloomreach automatically obtains and refreshes short-lived access tokens from Fides. No manual token rotation is required.
-
Generate OAuth2 client credentials by calling the Fides API:
POST /api/v1/plus/connection/{connection_key}/consent-webhook/oauth2-clientThe response contains
client_idandclient_secret. Save these values — theclient_secretis only shown once. -
On your Bloomreach admin dashboard navigate to Data & Assets > Integrations and click
+ Add new integration. -
Search for
OAuth 2.0and click on+ Add integration. -
Configure the OAuth 2.0 integration:
- Token endpoint URL:
https://{your-fides-url}/api/v1/oauth/token - Client ID: Use the
client_idfrom step 1 - Client Secret: Use the
client_secretfrom step 1 - Client Authentication Method: Select
Auth HeaderorBody parameters
- Token endpoint URL:
-
If your Fides URL differs from the token endpoint domain, enable "Allow webhooks from domains other than the token's endpoint" and add your Fides base URL to the allowed domains list.
-
Click Save Integration.
To generate new credentials (e.g., if the secret is lost), call the same endpoint again. The previous credentials will be invalidated.
Option B: Static Bearer token (deprecated)
Deprecated. Static Bearer tokens expire after 90 days and must be manually refreshed. Consider using OAuth2 client credentials (Option A) instead.
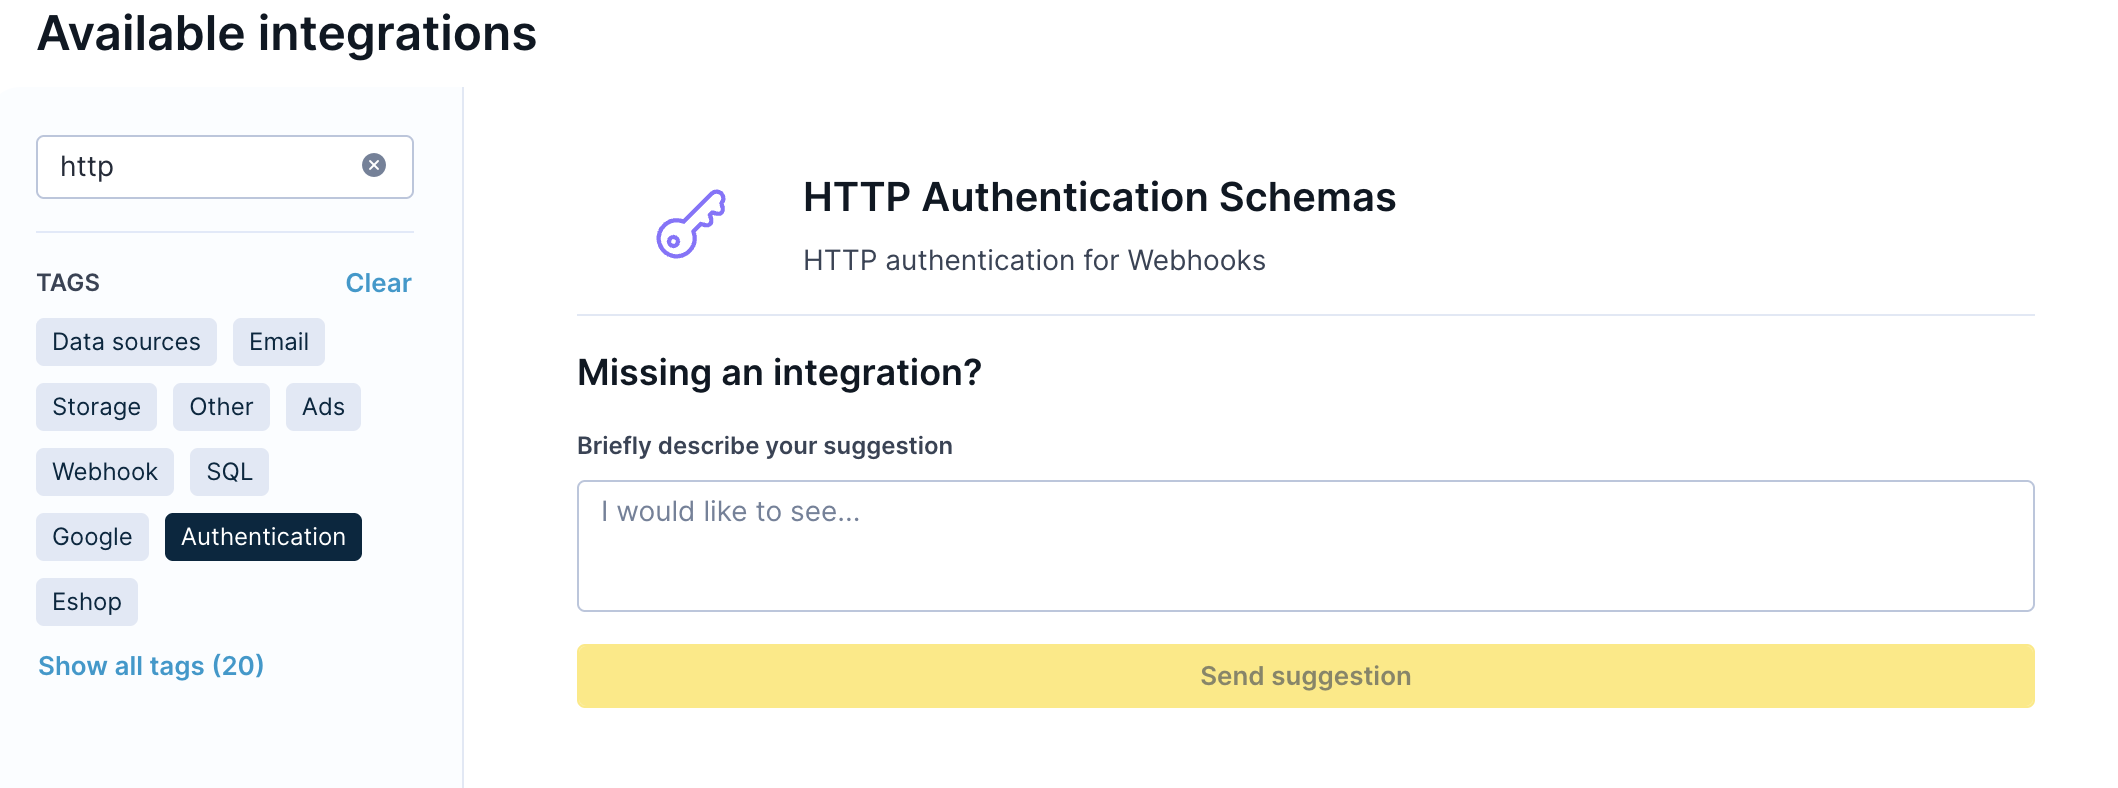
- On your Bloomreach admin dashboard navigate to Data & Assets > Integrations and click
+ Add new integration - Search for
HTTP Authentication schemasand click on+ Add integration
- Select custom headers. Endpoint:
your_fides_url, Key:Authorization, Value:Bearer {your_consent_webhook_token}.
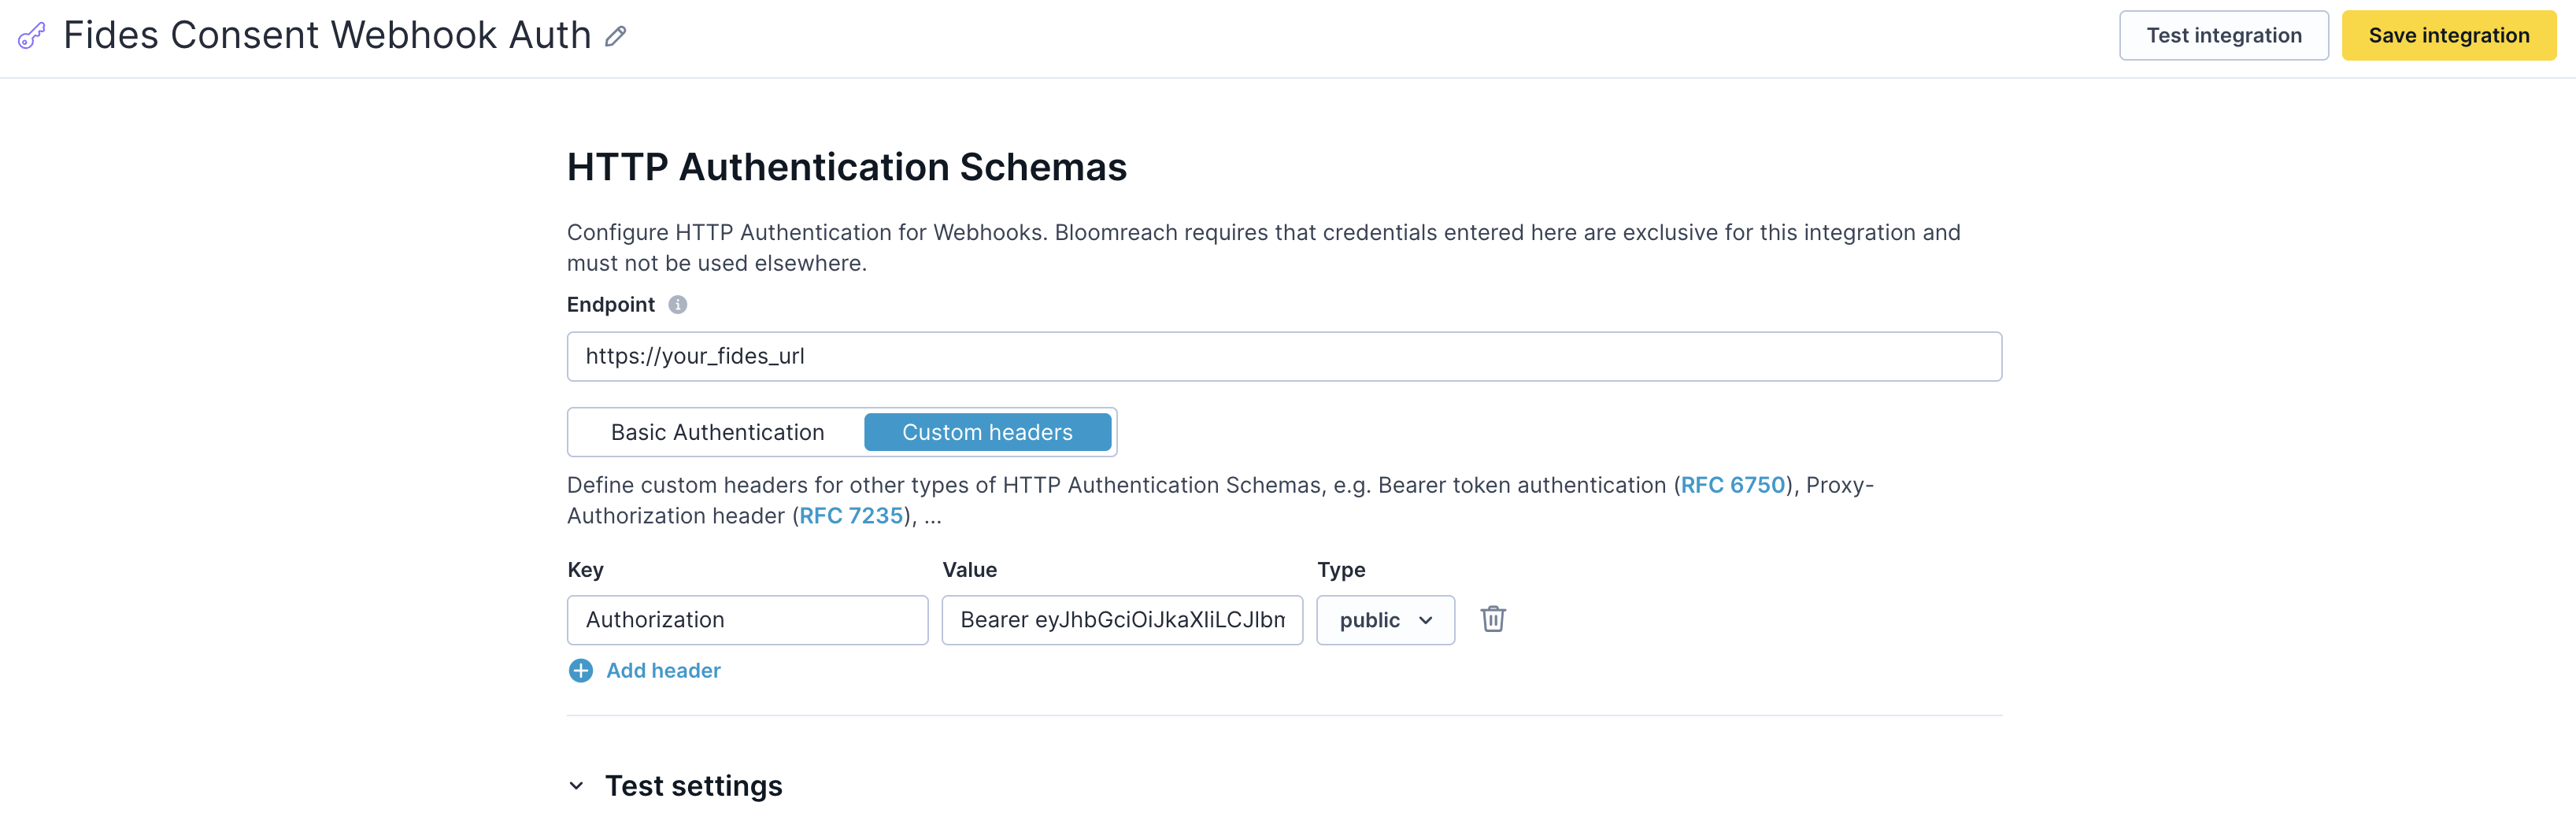
- Click on
Save Integration.
Scenario setup
Once you have configured authentication (either OAuth2 or static token), create a Bloomreach scenario to forward consent events:
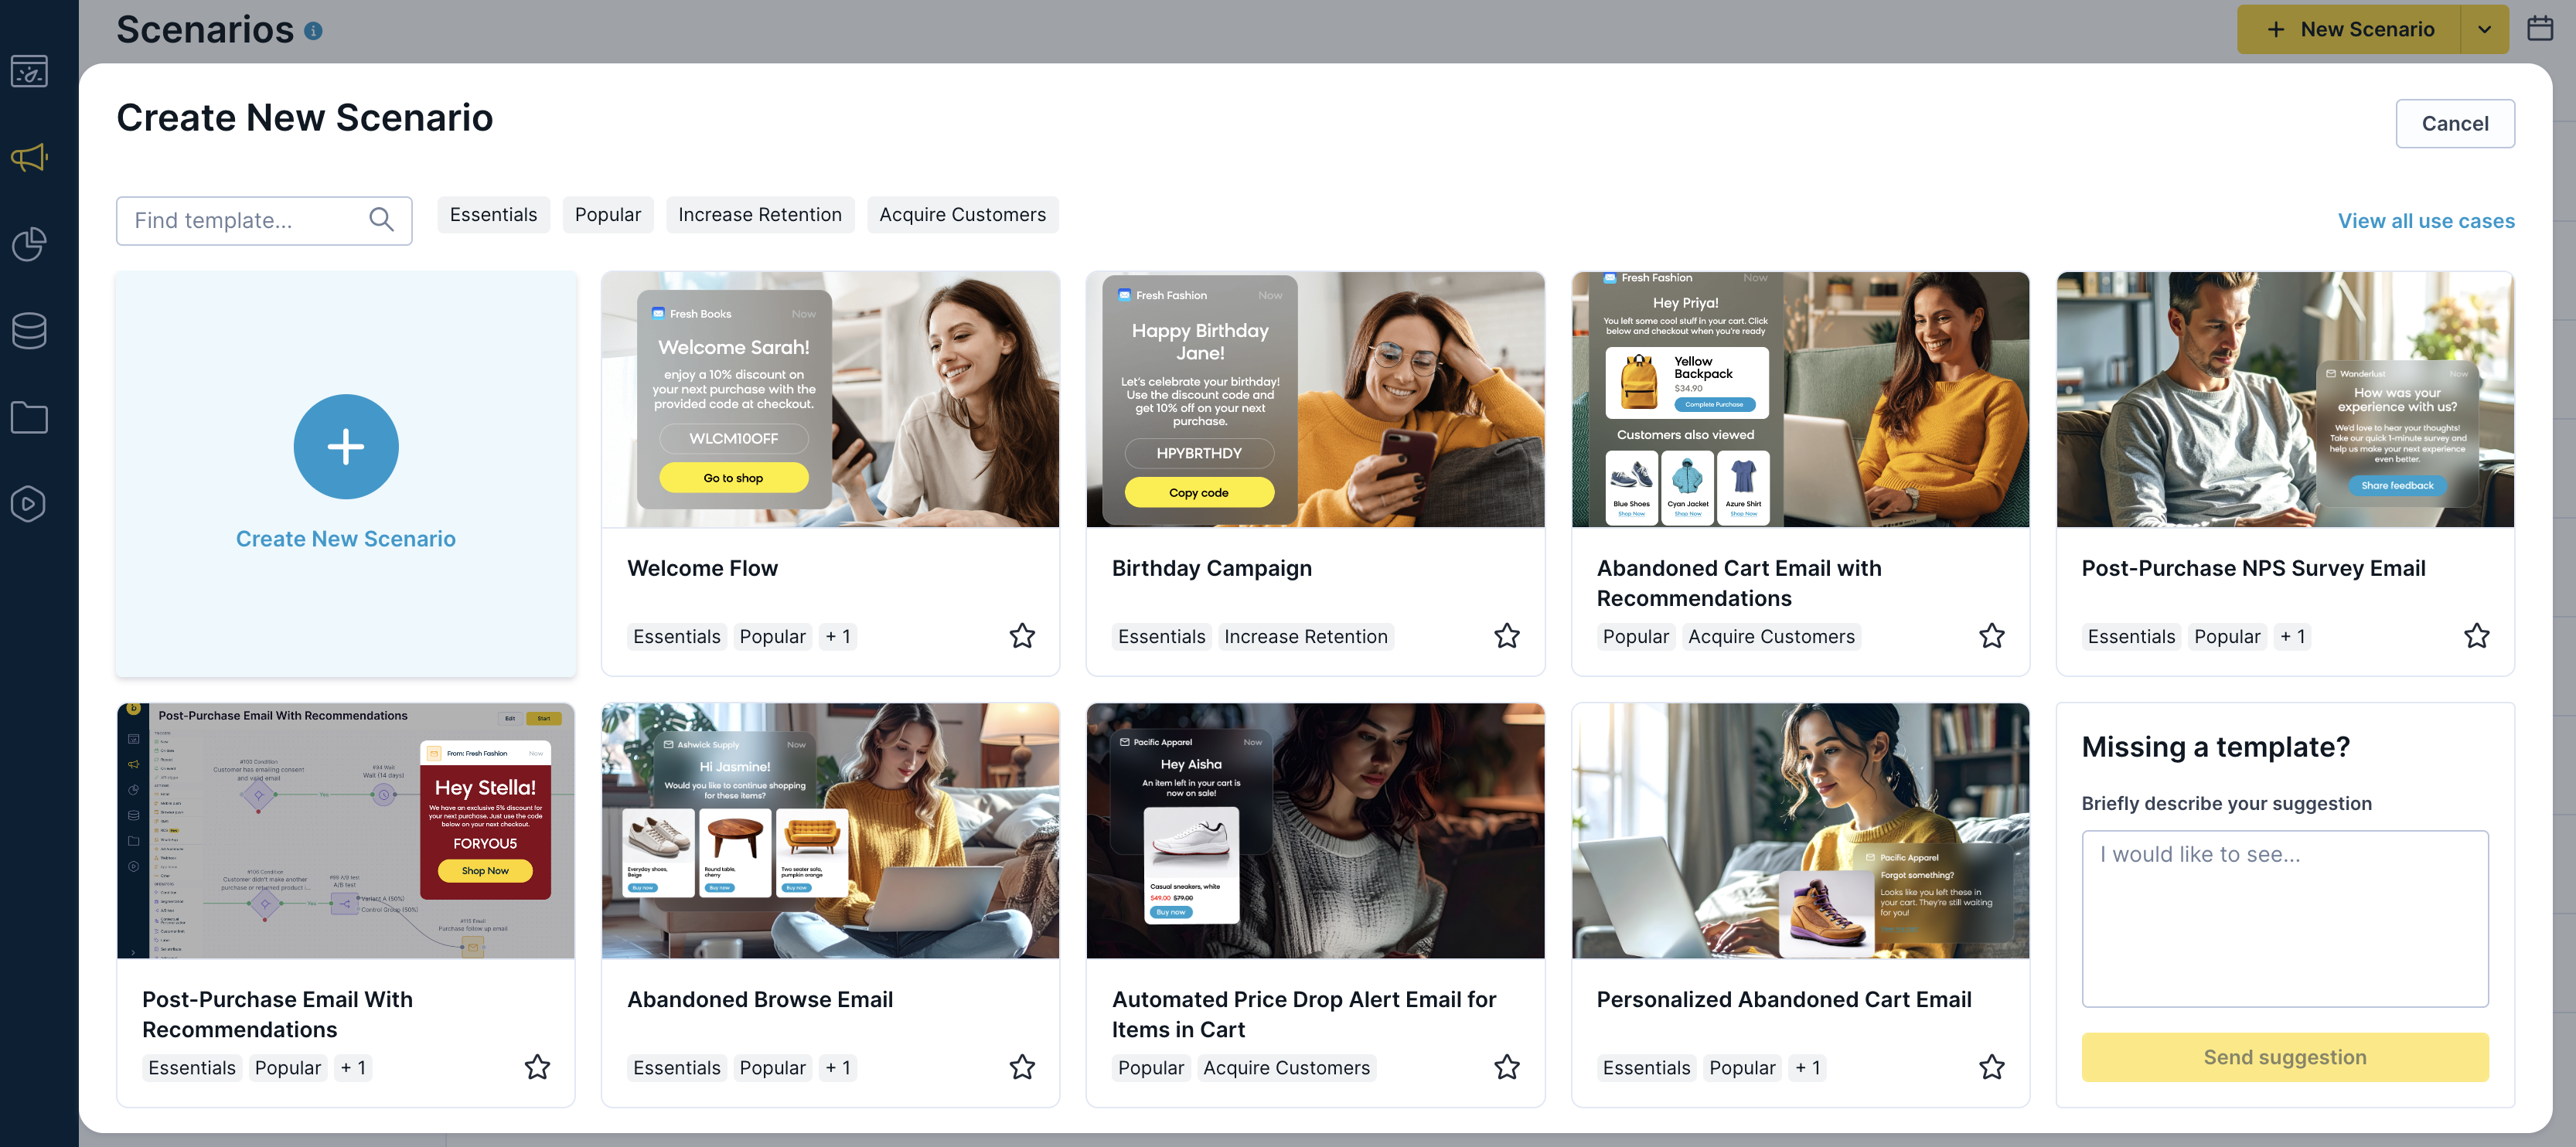
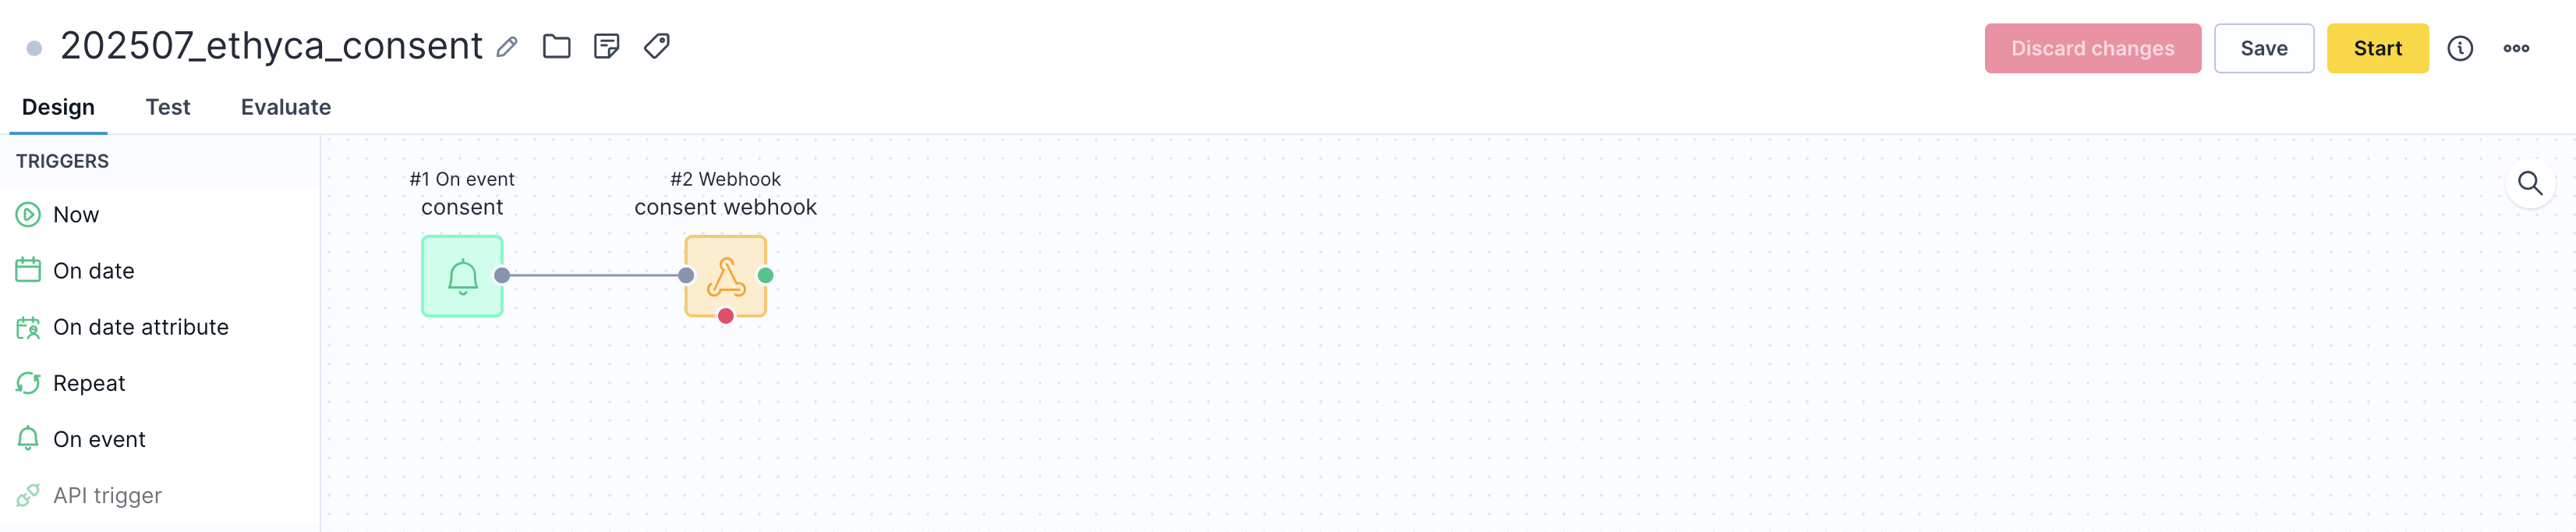
- Navigate to
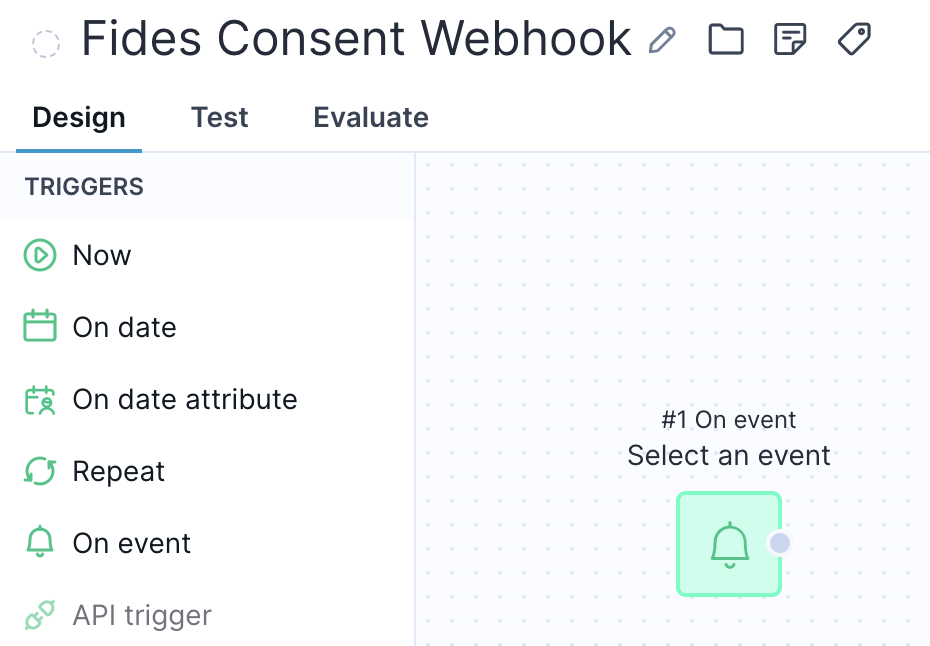
Campaigns > Scenarioand click on+ New Scenario. On the pop up window clickCreate New Scenario
- From the selection tab on the right grab the
On eventitem located on the triggers section and drop it on the canvas.
- Click on the added
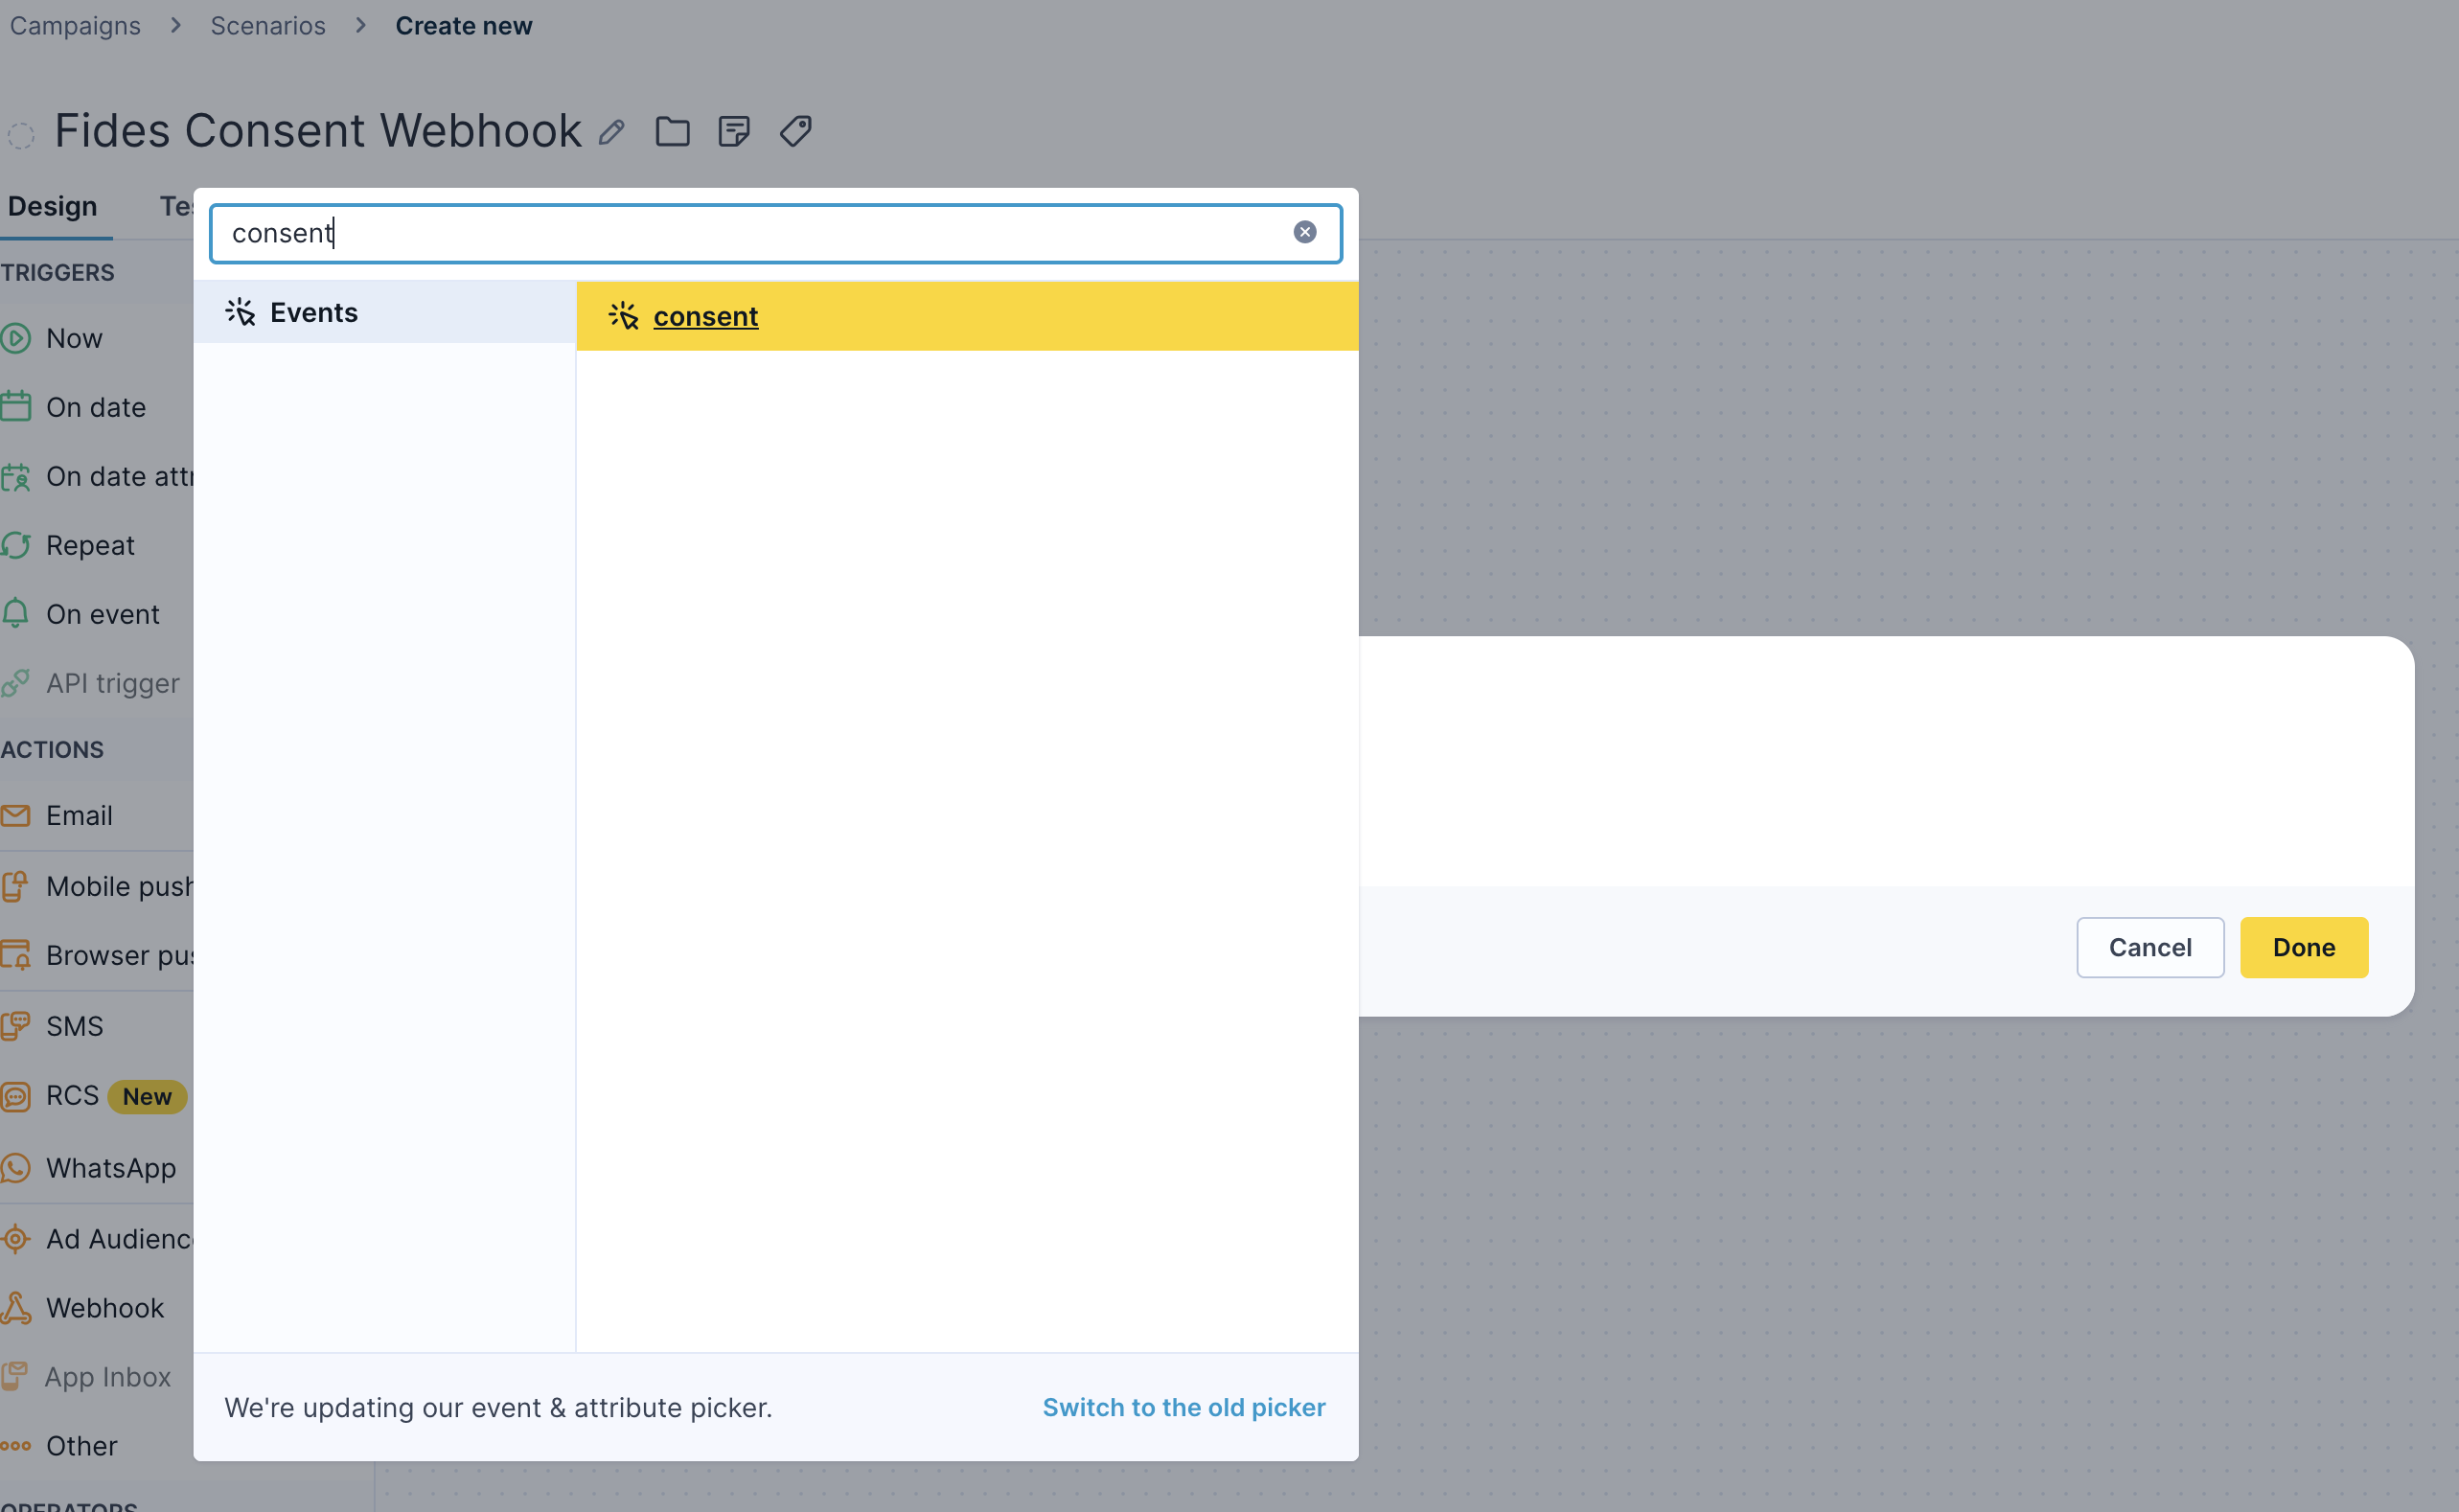
On eventitem and selectconsentas the event trigger.
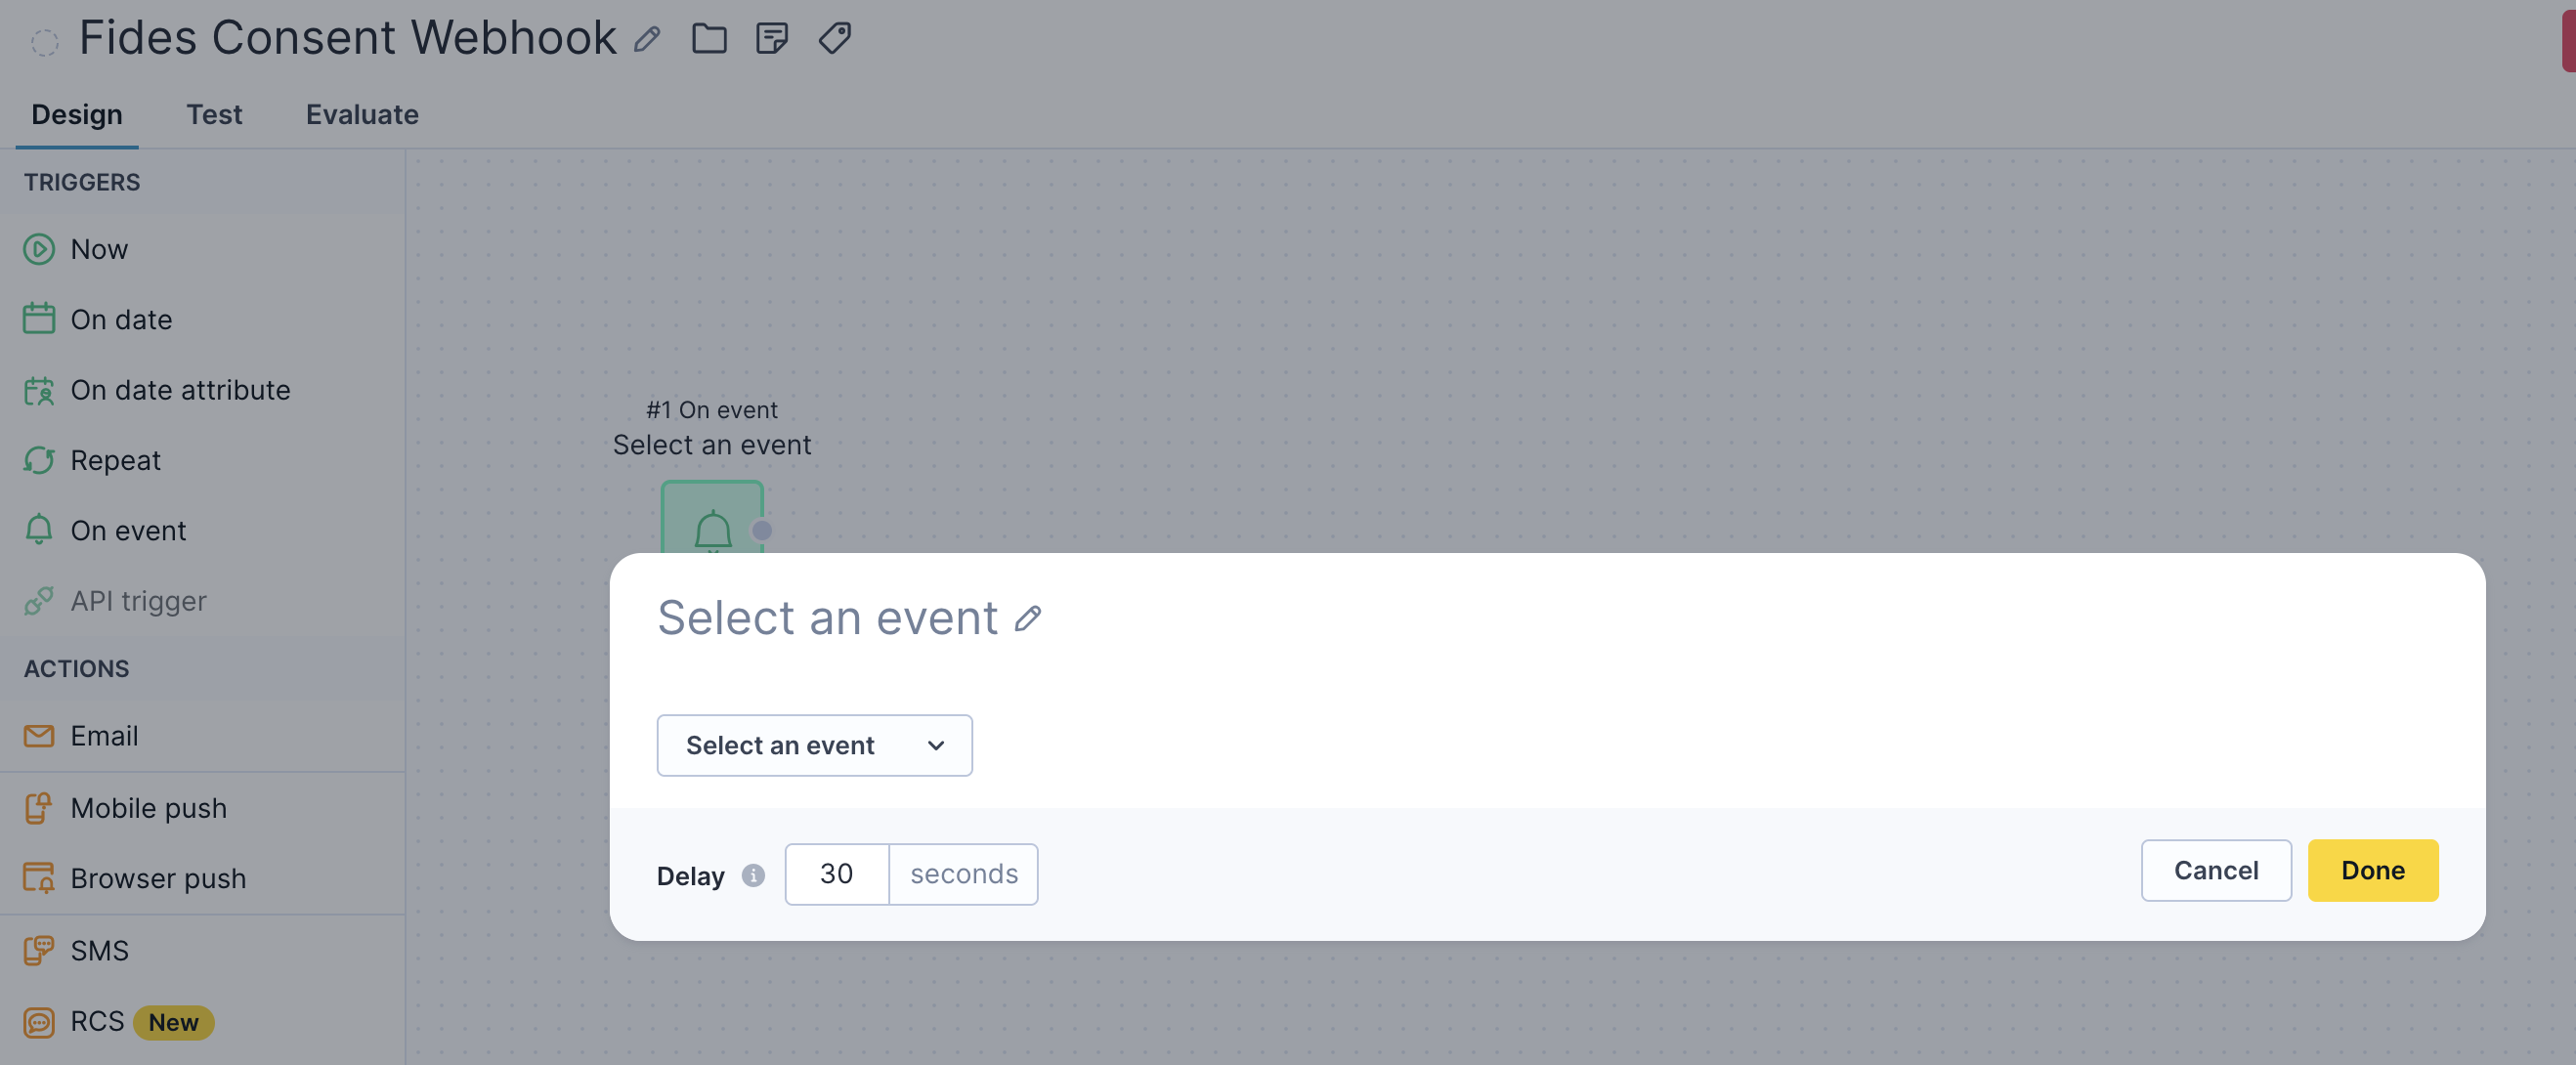
- Click on
Done. - From the selection tab on the right grab the
Webhookitem located on the actions section and drop it on the canvas.
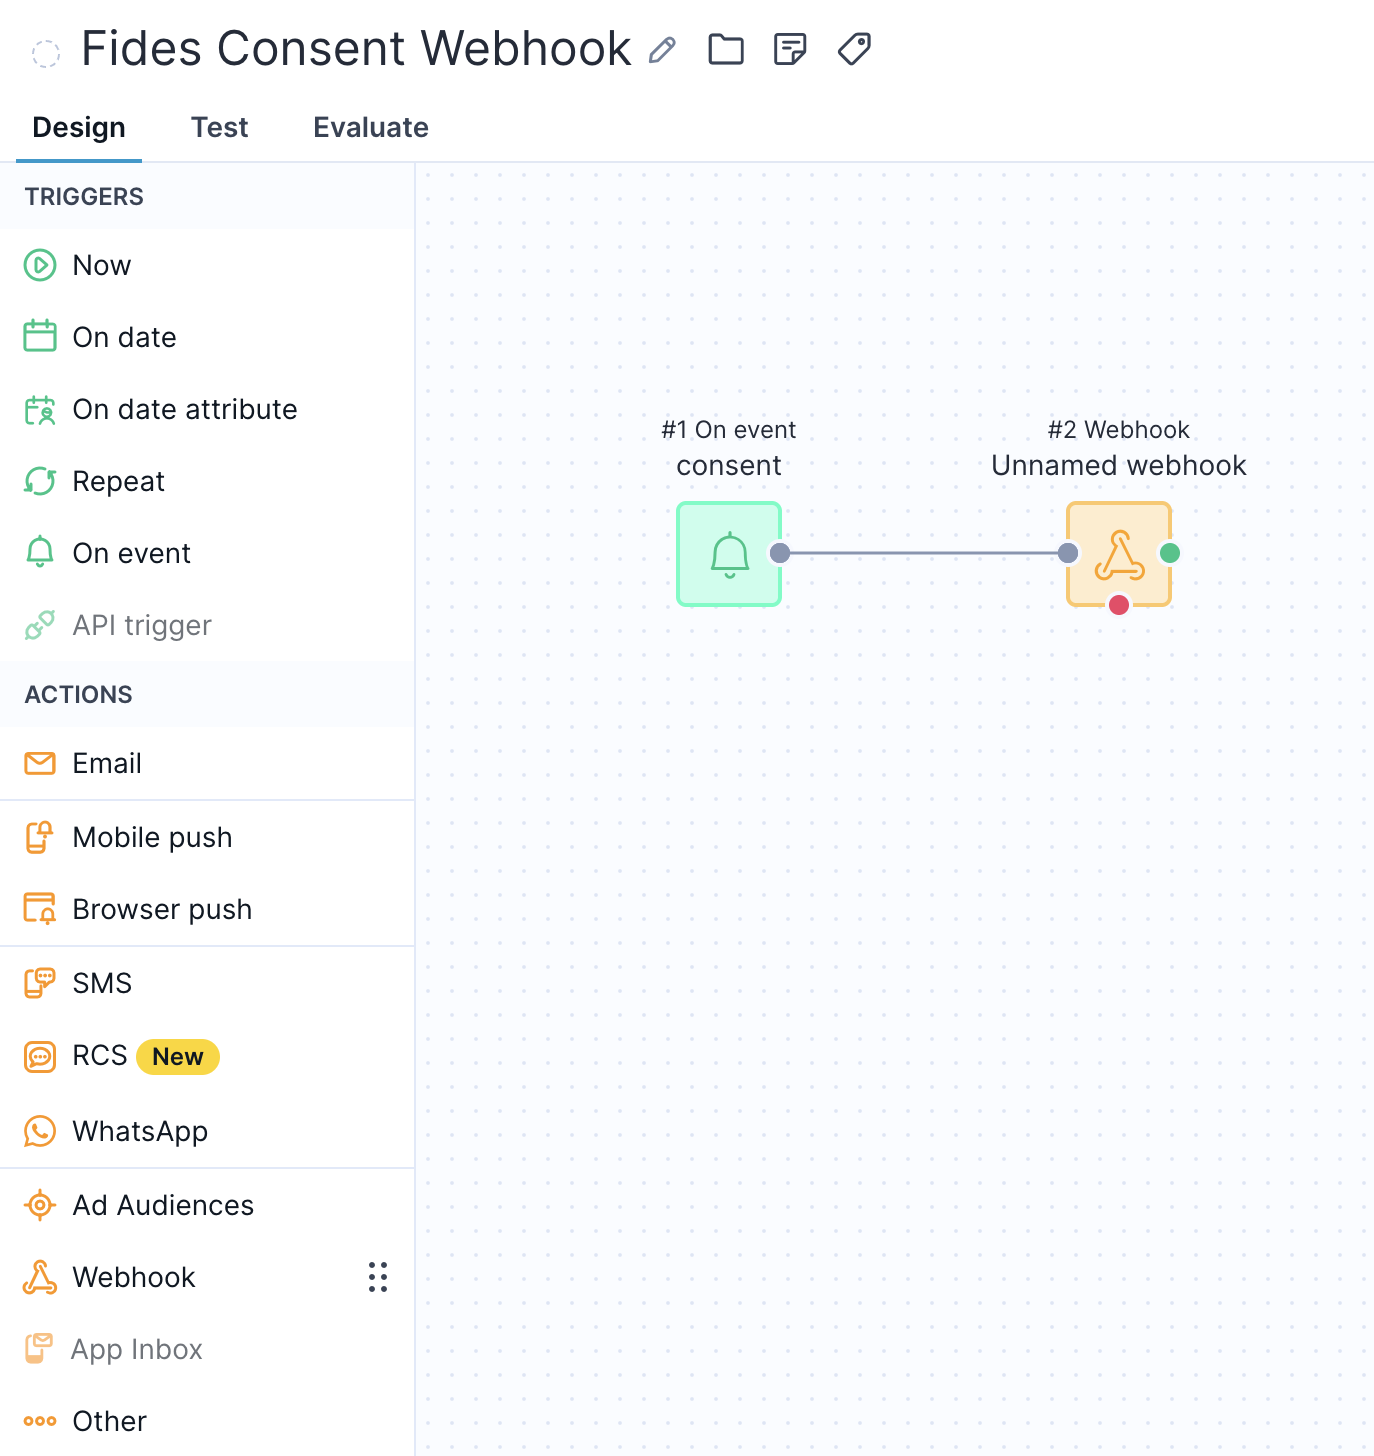
- Click on the newly added webhook item and navigate to
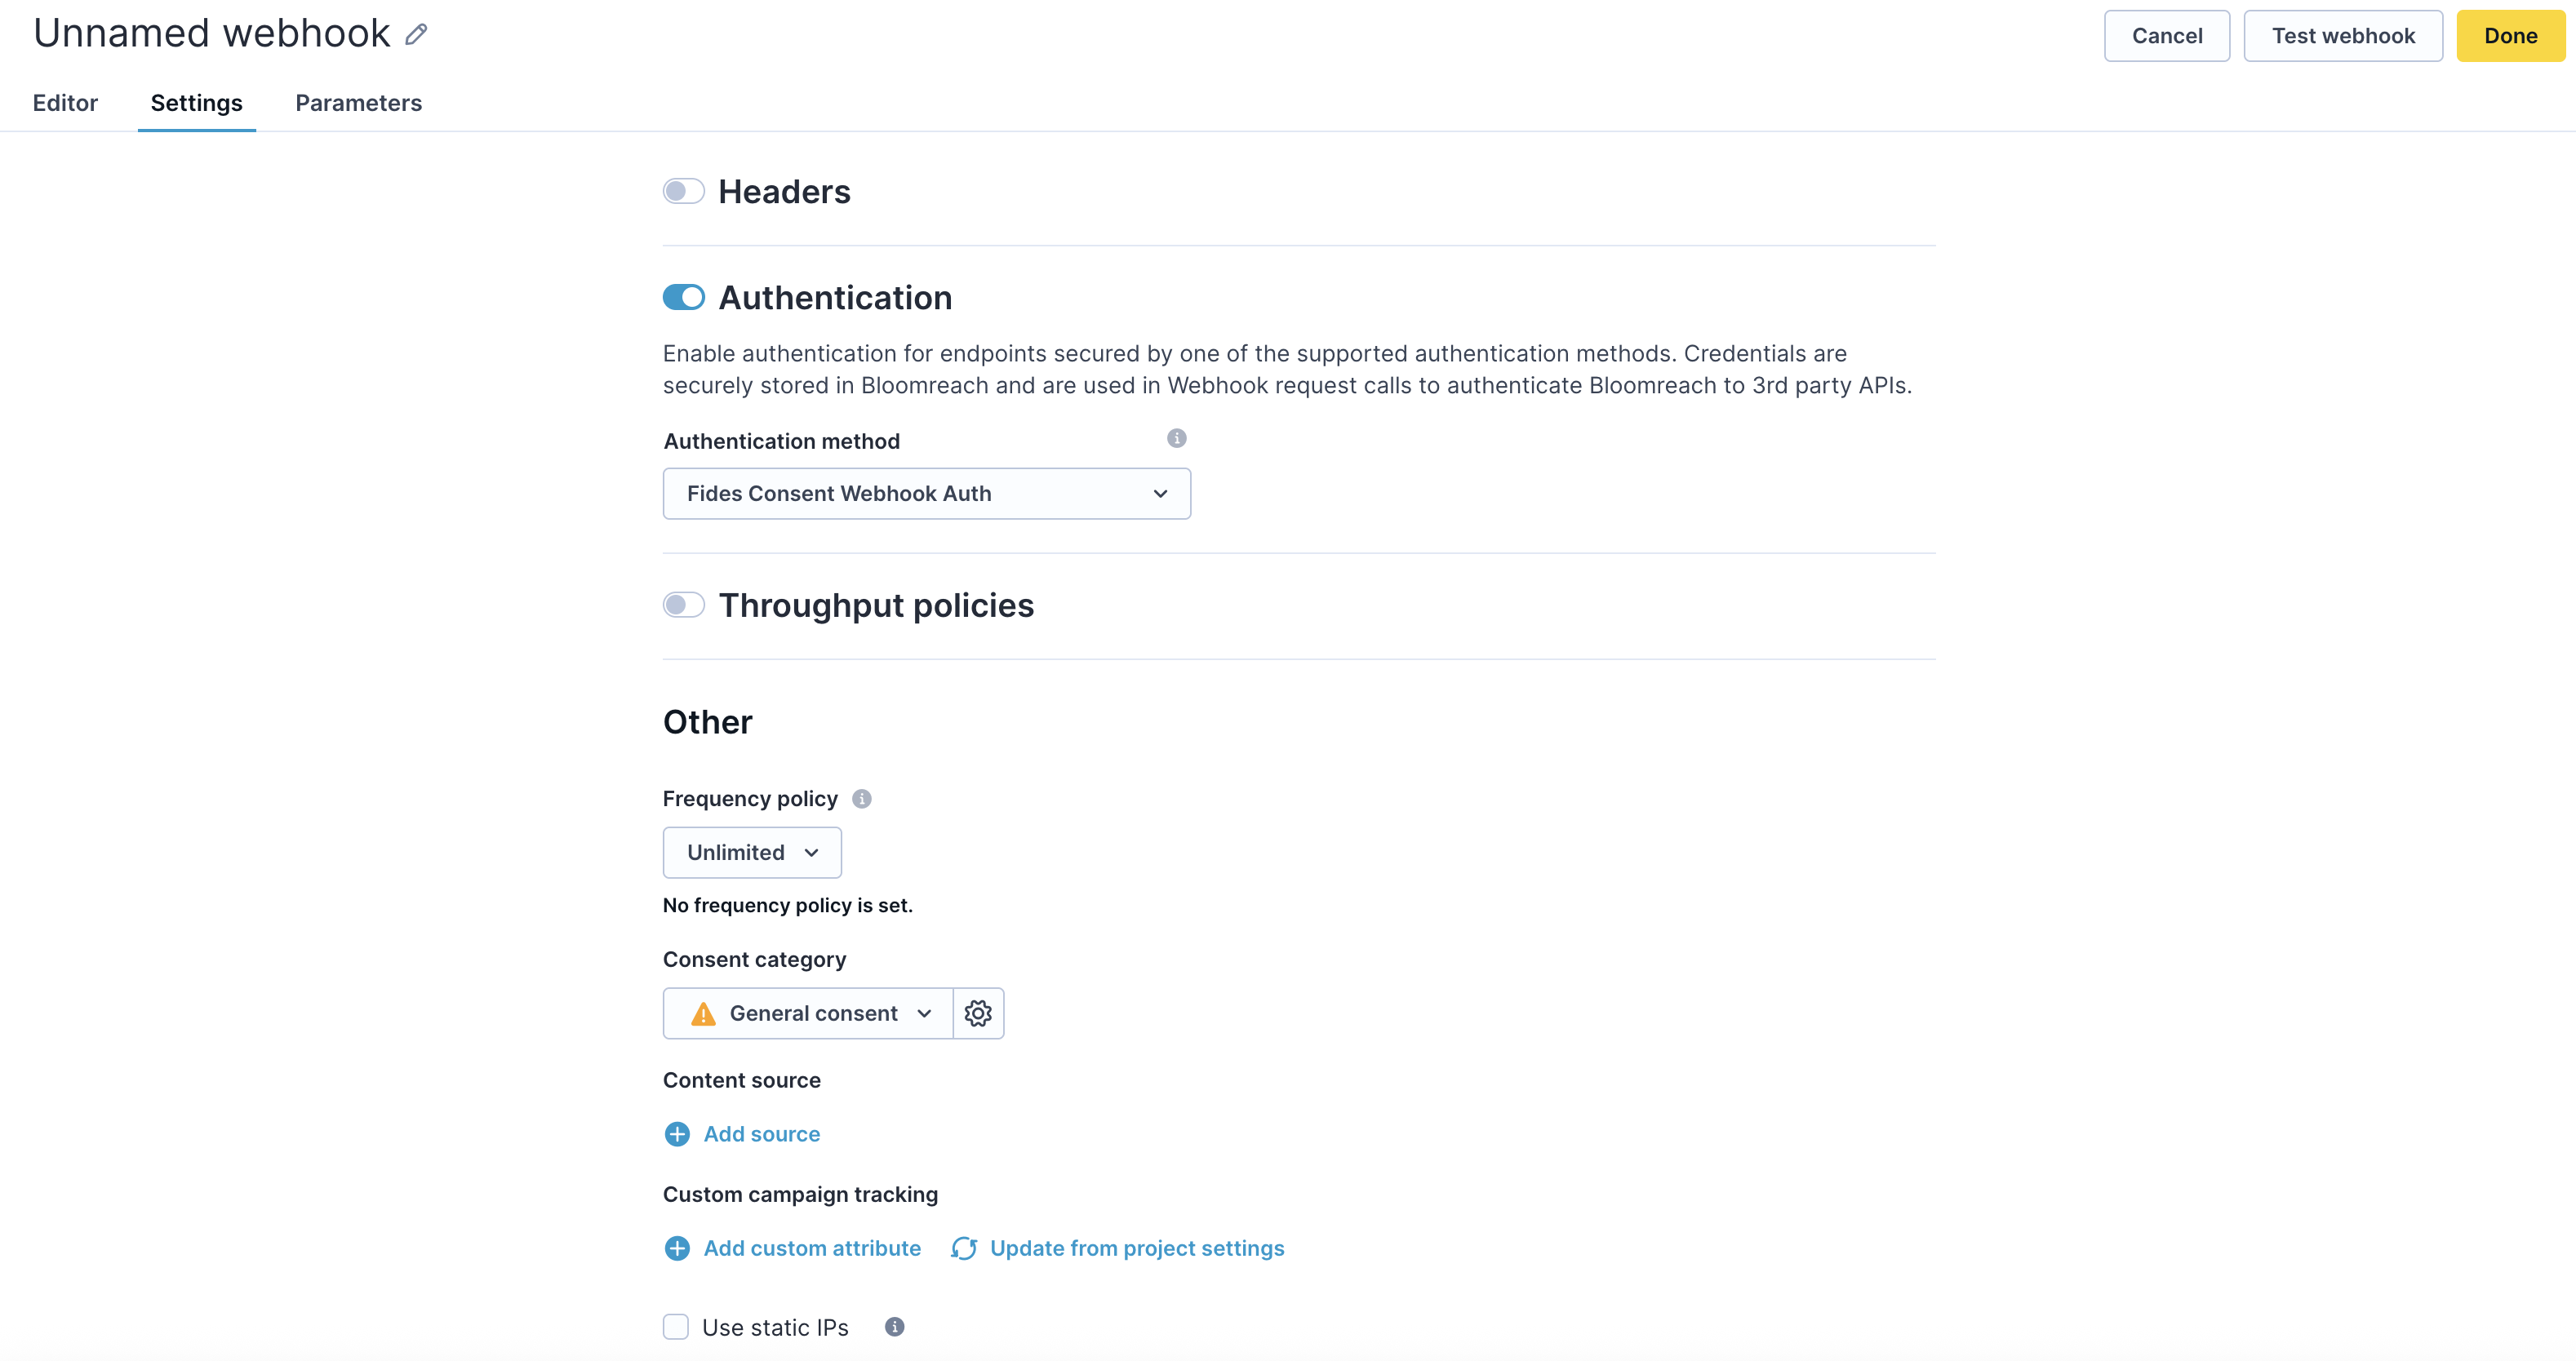
Settings. - Activate the Authentication option and select your recently created authentication from step 4.
- On the
Othersection click on theConsent Categorydropdown and selectGeneral Consent.
- Navigate back to the
Editortab of the webhook.
- You'll notice that the base url from the webhook is now the url that was setup on the authentication integration. In this example the
fides_urlis an ngrok endpoint. - The endpoint method should be set to
POST. - The dropdown to the right of the
Endpointheader should be set toDo not process response. - On the empty textbox to the right of our base url set the endpoint to
/api/v1/plus/connection/{{integration_identifier}}/consent-webhook - The payload must contain the following parameters. (Note that the customer_id can be either a soft_id or a hard_id in this example we set it to the hard_id
registered)
{
 "customer_id": "{{ customer_ids.registered }}",
 "email": "{{ customer.email }}",
 "category": "{{ event.category }}",
 "action": "{{ event.action }}"
}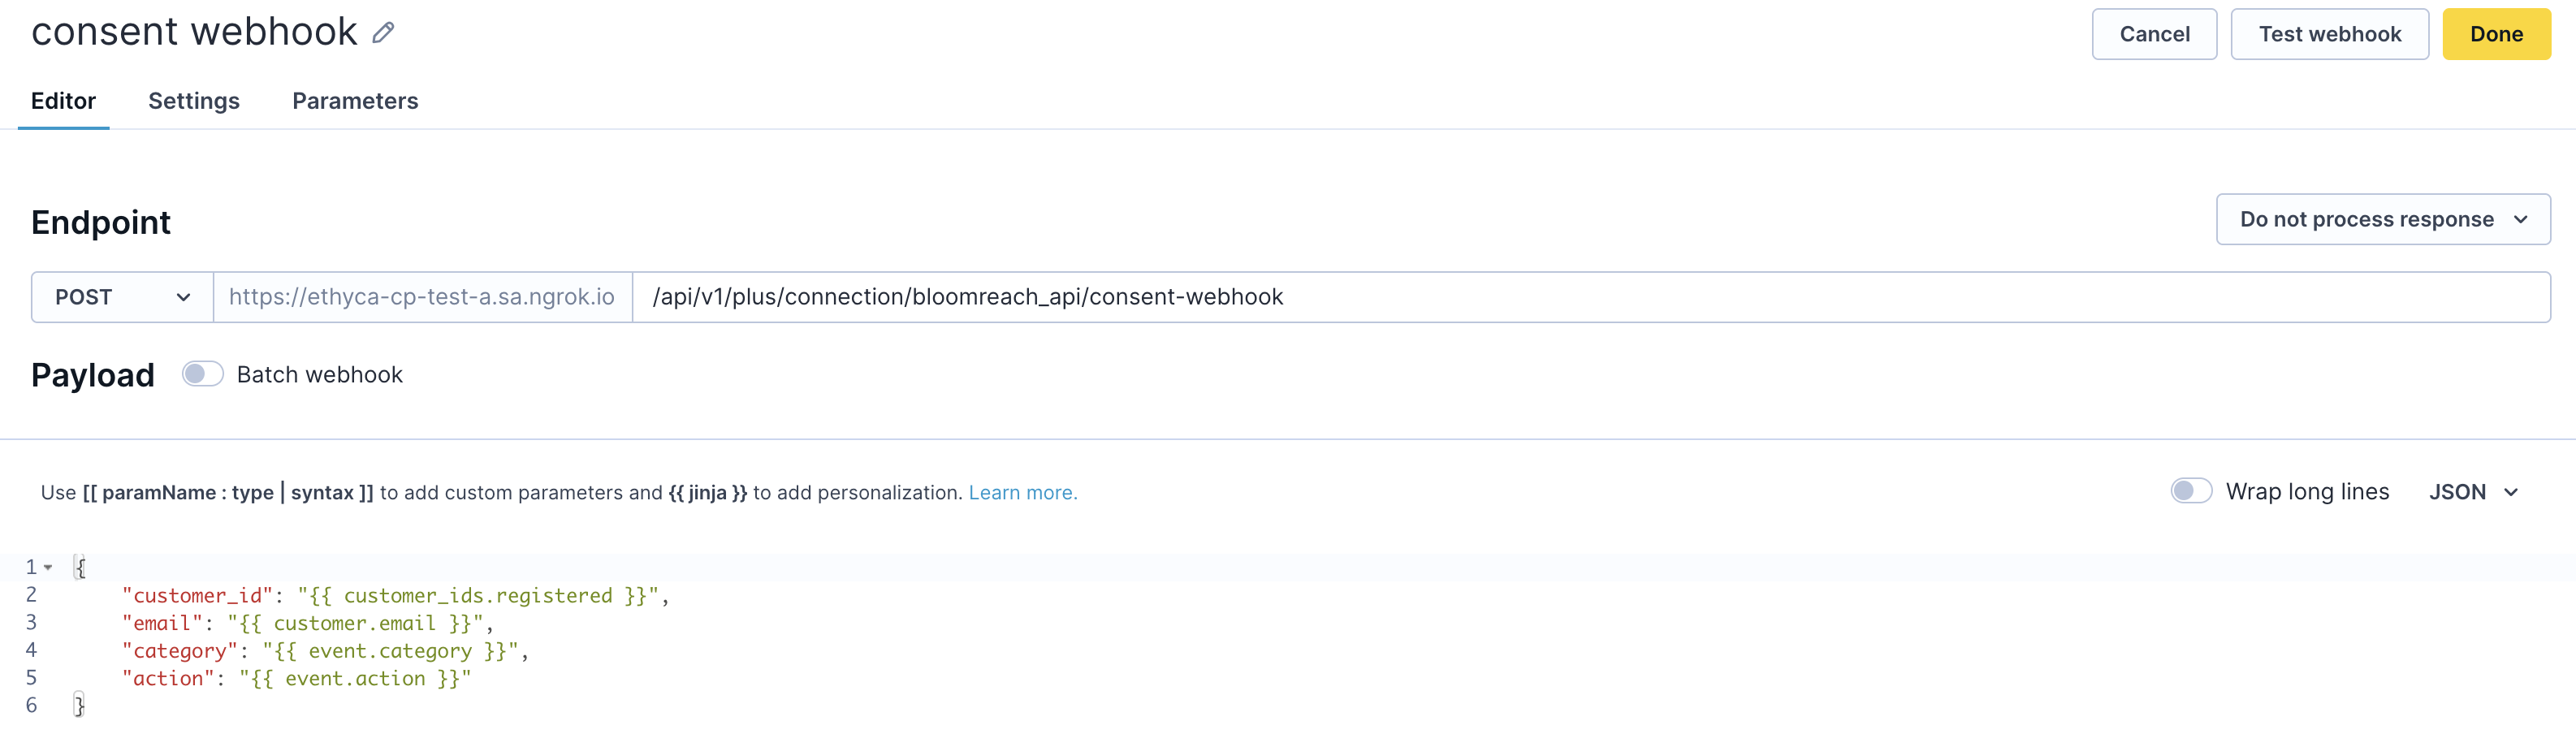
The webhook endpoint expects a specific payload format. Make sure your Bloomreach webhook configuration sends the customer ID, email, category, and action fields as required.
- You may now click on
Test Webhookto verify that the payload is being received by fides. - Click on
Done.
- Click on
Saveand thenStartyour scenario.
By configuring this scenario. Any consent event that happen inside of Bloomreach will be automatically forwarded and stored within Fides.
Technical detail
Fides utilizes API endpoints to access the API service for a SaaS application. An API service is the programmatic interface through which Fides can query and update data within an application to access, rectify, or delete personal information. Each SaaS tool will have a unique set of endpoints to enable privacy functions.
Bloomreach Endpoints
In the table below, you can find which endpoints are used for each type of privacy function. Clicking on the endpoint will take you to the documentation for that endpoint.
| Privacy function | Endpoint | Description |
|---|---|---|
| Access Requests | Export Customer (opens in a new tab) | Returns information about a customer and their data |
| Update or Delete Requests | Anonymize Customer (opens in a new tab) | Used to anonymize/delete a customer's data |
| Consent Access Requests | Get Consent Categories (opens in a new tab) | Used to retrieve all available consent categories |
| Consent Access Requests | Get Customer Attributes (opens in a new tab) | Used to access a customer's current consent preferences |
| Consent Update Requests | Track Consent Events (opens in a new tab) | Used to update a customer's consent preferences |